
Visual scripting or visual programming is a form of programming that lets the user create programs by using graphical elements instead of writing traditional code. This makes it easier to use by non-programmers, as they don’t have to learn a specific language, and allows for faster prototyping by designers.
In this blogpost I will talk about how I made a tool for creating a visual script based on a node graph, and then generating a Lua script from it.
A tool for creating visual scripts
1. Structure of a visual script
There are different approaches for creating visual scripts. The two most common ones are:
- The Unreal Engine Blueprints, where the blueprint contains both the object and the script.
- The Unity Visual Scripting, where the script is added to the game object as a component.
I decided to use the second approach because it gives the user the flexibility to add and remove script components at runtime, and because it pairs well with the entity component system (ECS).
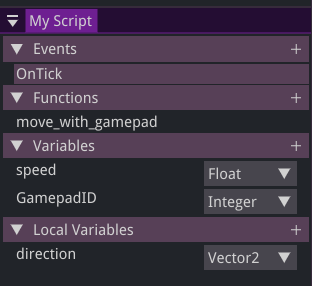
My visual scripts consist of the following elements:
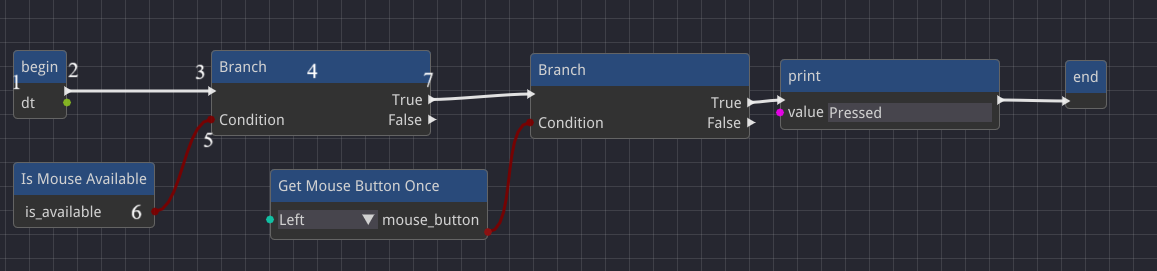
- Events that they implement (such as
OnTickandOnCollision) - Functions
- Variables
- Each event and function can have their own local variables.
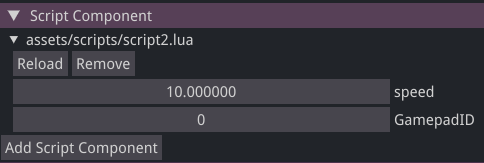
The script variables can be shown in the inspector and they act like an interface for the user to use in order to customize the behaviour of the script:
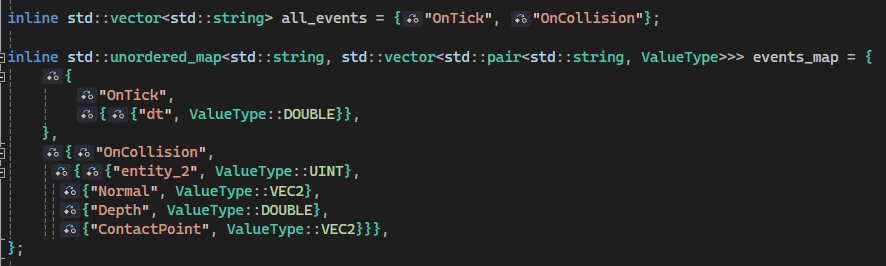
Adding a custom event is as simple as adding the name of the event to the map of events in the
config.hpp and specifying the parameter names of that event and their value type:
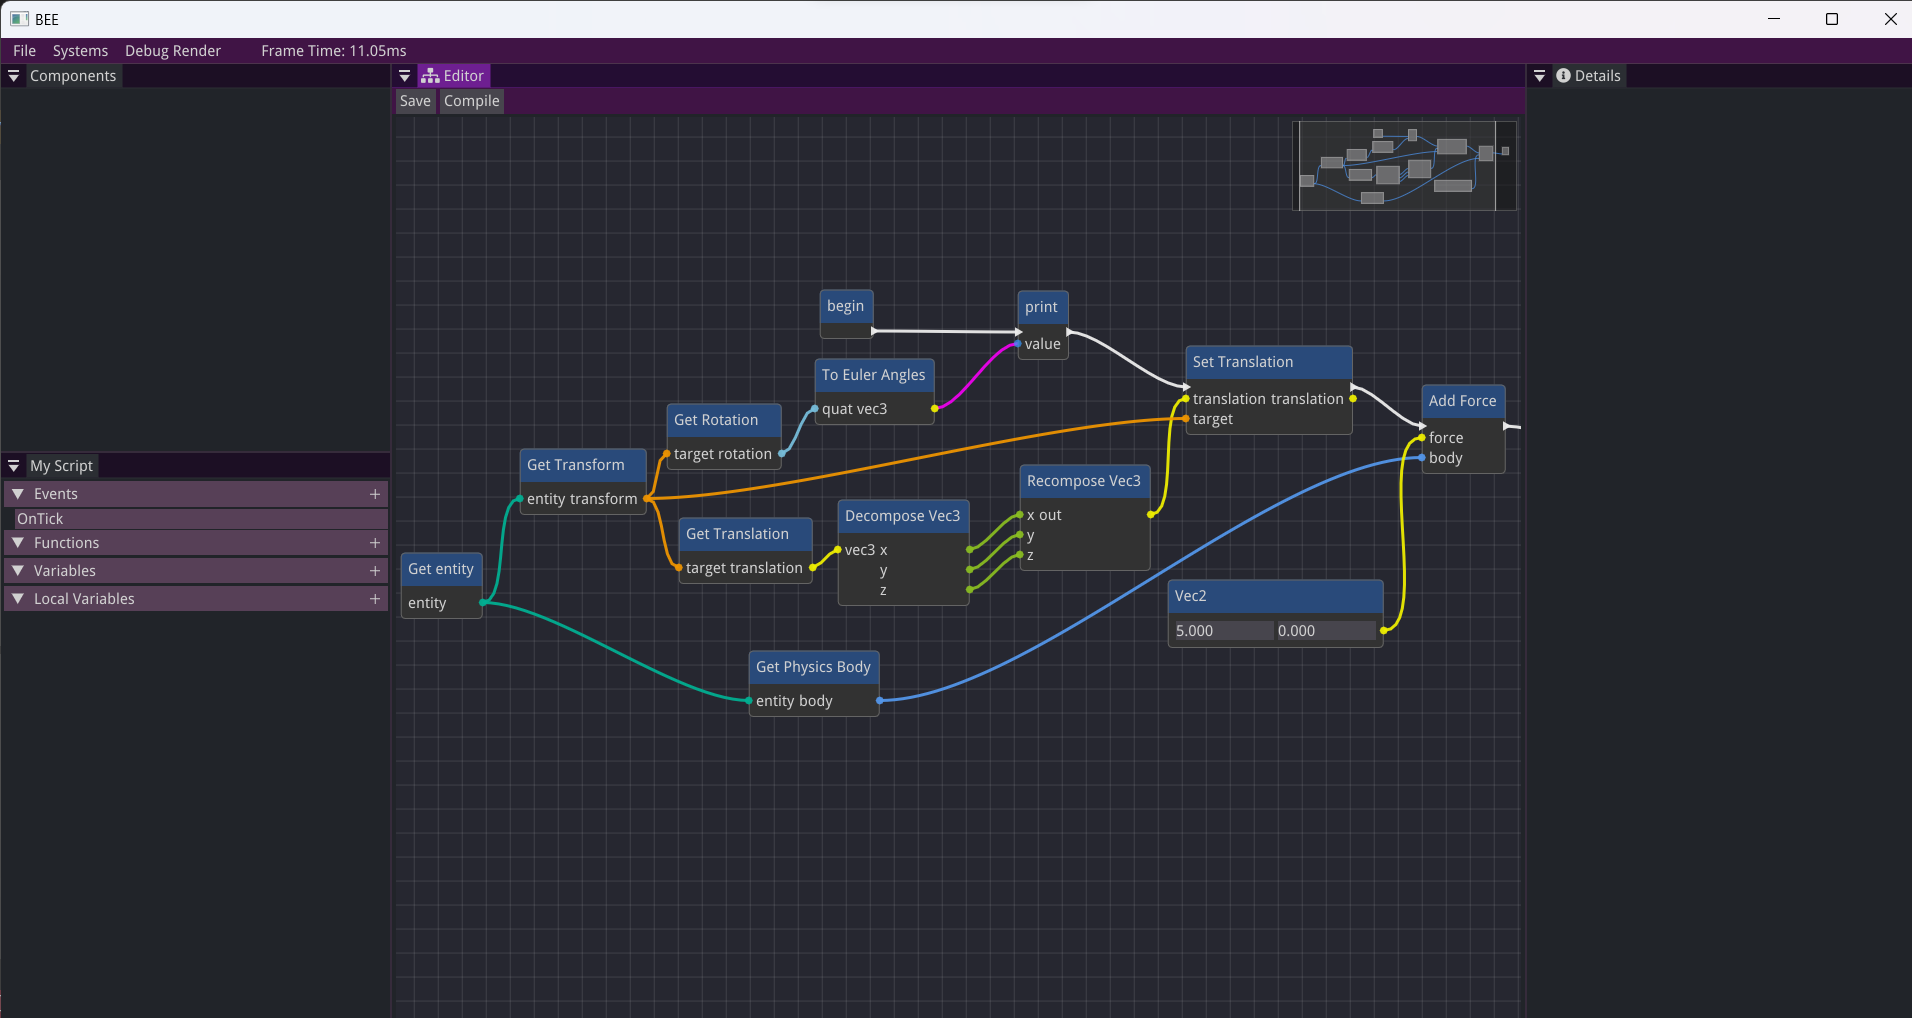
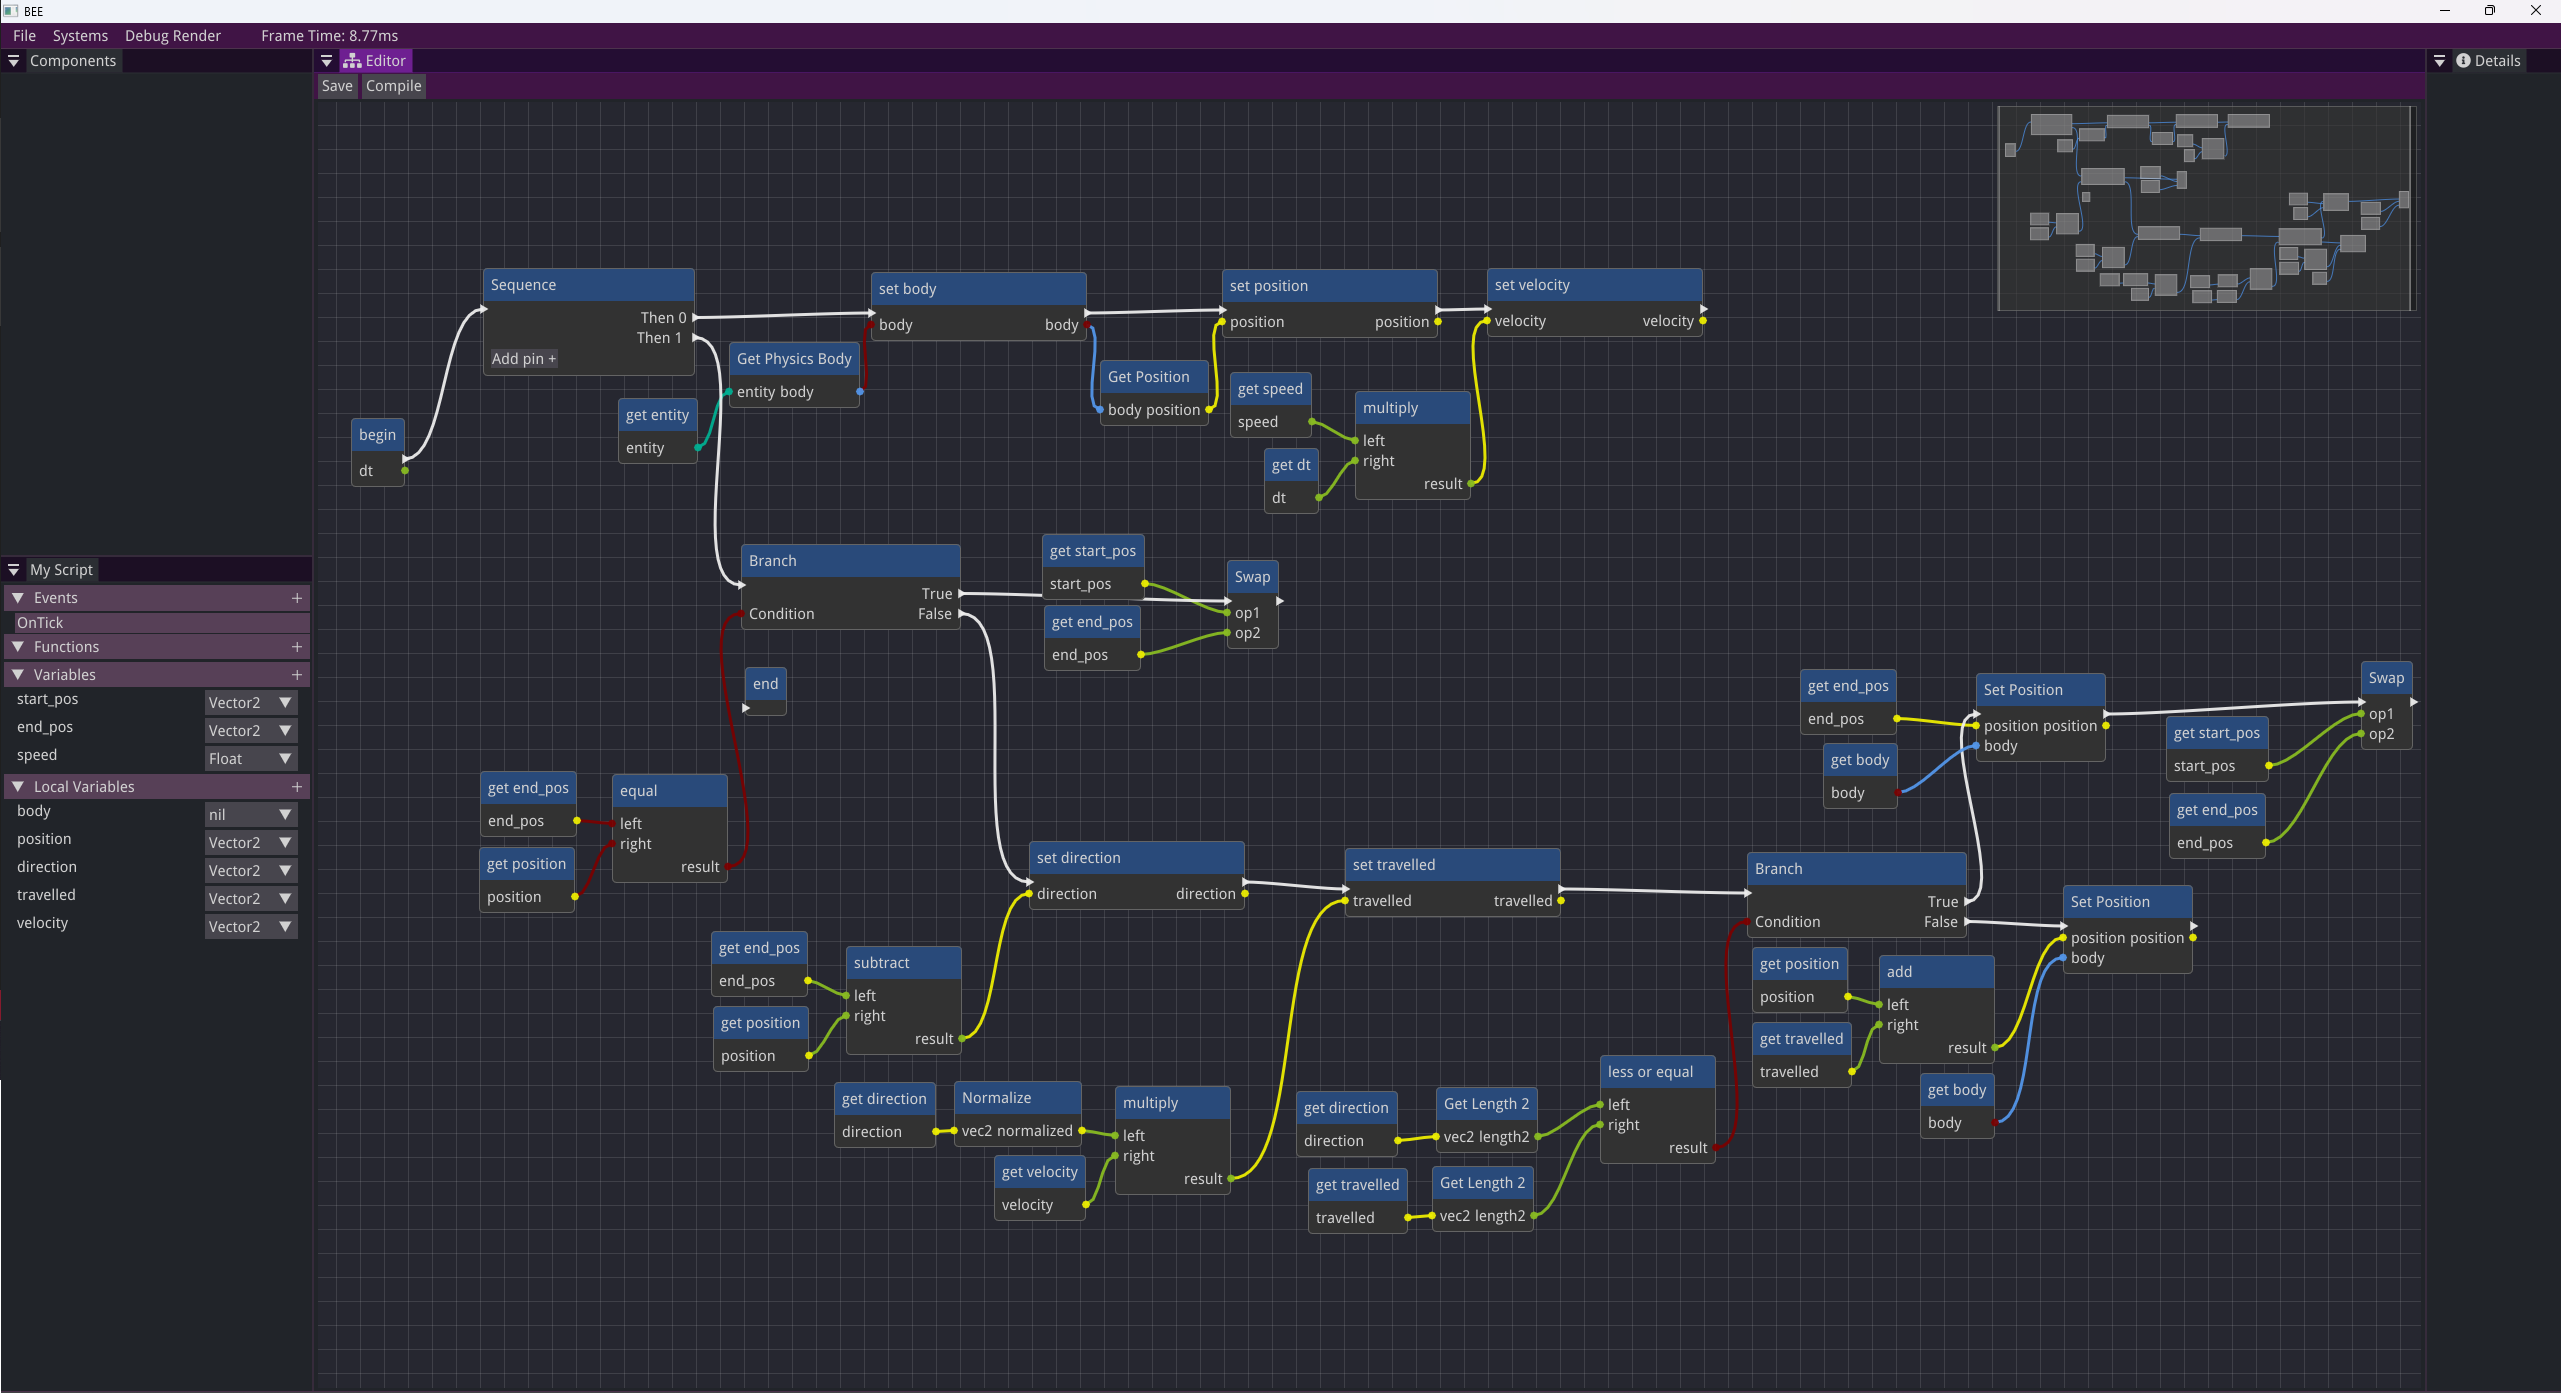
2. The graph and the nodes
Every function and event have their own node editor that stores their graph.
As a library for showing the graph I chose to use imnodes, because it’s lightweight, easy to use, has
good documentation and examples, and provides a graph implementations with IdMaps so that the nodes
and the edges are sorted.
A node has two representations:
- A
Nodethat stores information about the node itself (note that pins are nodes in the graph too), the value that it has, and other information necessary for representing it as a Lua statement. - A
UiNodethat stores information about the UI representation of the node, such as name, IDs of input pins, IDs of output pins, etc.
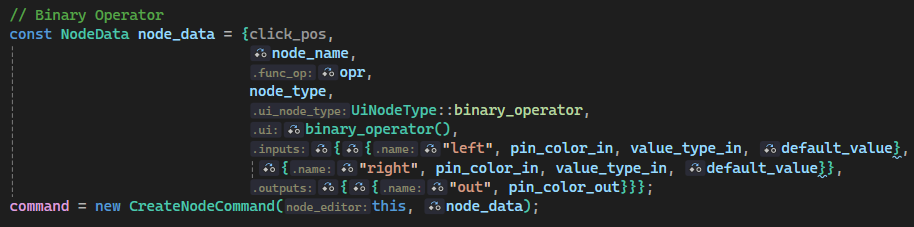
3. Undo and Redo - The command pattern
In order to implement undo / redo for the tool, adding nodes had to be done using the command pattern
This means that in order to be able to add a new node to the graph, the command has to know how to
build the node. This information is passed using the NodeData struct:
struct InputPin
{
    std::string name;
    pin_color pin_color = pin_color_default;
    ValueType type = ValueType::nil;
    registered_types value = {};
    std::string op; // Used for enums
};

struct OutputPin
{
    std::string name;
    pin_color pin_color = pin_color_default;
};

typedef int NodeDataFlags;
enum NodeDataFlags_
{
    NodeDataFlags_None = 0,
    NodeDataFlags_HasExecutionPinIn = 1 << 0,     // Sets whether node has an execution pin in
    NodeDataFlags_HasBreakPin = 1 << 1,           // Sets whether node has a break pin
    NodeDataFlags_ConnectOutputPinToNode = 1 << 2 /* Make edges between node and output pins.
(Default behaviour is to make edges between output pins and node only)*/
};

struct NodeData
{
    ImVec2 click_pos;
    std::string name;
    std::string func_op;
    NodeType node_type;
    NodeEditor::UiNodeType ui_node_type;
    NodeEditor::node_types ui;
    std::vector<InputPin> inputs = {};
    std::vector<OutputPin> outputs = {};

    NodeDataFlags flags = NodeDataFlags_None;
    int num_execution_pin_out = 0;
};
In order to add new types of nodes (that generate Lua code in a different way than the already
available ones), the user has to add a new value to NodeType enum and then implement a
case in the Node::evaluate specific for that new type. The user can also make a new value
to the UiNodeType enum if they want a custom representation of the node in the graph.
Make sure to always add new values to the bottom of the enum, because otherwise you are going to
break existing visual scripts!
Before adding a new value and implementation, check whether the new node can use one of the
available types.
Evaluating the graph and generating the code
The algorithm for generating a Lua script is the following:
-
Create a new type in Lua with the name of the script.
- A table that is going to have the variables, functions, and events of the script.
- Used to create new instances of that script when emplacing it on an entity.
-
Generate constructor:
- The arguments of the constructor are the variables of the visual script.
- Generate events and functions
- Return the newly created type so that it can be used for creating new instances.
-
Generating the body of a function starts from the
beginnode. -
The algorithm follows the
execution pin outof thebeginnode and goes to theexecution pinin to which it is connected. -
The
execution pinin is connected to a node. -
Based on the type of the node, the algorithm decides how to evaluate its
input pinsand what Lua code to generate. -
The
input pinsare connected tooutput pins. -
The
output pinsare connected to a node and evaluate themselves based on the type of the node they are connected to. -
If the node has an
execution pin outthe algorithm follows it towards the next node as in step 2. -
Based on the type of the node, it can have multiple
execution pins outor even some custom pins. In this case, the user has to specify how the node should be processed by the algorithm so that the code is generated correctly. -
If the node isn’t connected to an
execution pin outpin or that pin isn’t connected to anexecution pin in, the algorithm stops and returns the generated Lua script.
After the algorithm is finished, the generated Lua script is saved and is added to the script manager class so that it can be added to entities as a component.
script2 = {}
script2.__index = script2

function script2.new(entity, speed, GamepadID)
	local o = {}
	setmetatable(o, script2)

	o.entity = entity
	o.speed = speed
	o.GamepadID = GamepadID

	return o
end

function script2:OnTick(dt)
	local direction = vec2.new(0.000000, 0.000000)
	if 	IsGamepadAvailable(self.GamepadID) then
		self:move_with_gamepad(dt)
	else
		if 	GetKeyboardKey(KeyboardKey.W) then
		direction = (direction + vec2.new(0.000000, 1.000000))

	end

	if 	GetKeyboardKey(KeyboardKey.S) then
		direction = (direction + vec2.new(0.000000, -1.000000))

	end

	if 	GetKeyboardKey(KeyboardKey.A) then
		direction = (direction + vec2.new(-1.000000, 0.000000))

	end

	if 	GetKeyboardKey(KeyboardKey.D) then
		direction = (direction + vec2.new(1.000000, 0.000000))

	end

	GetBody(self.entity).position = (GetBody(self.entity).position + (direction * (dt * self.speed)))

	do return  end

	end

end

function script2:move_with_gamepad(dt)
	local body = nil
	body = GetBody(self.entity)
	body.position = ((vec2.new(	GetGamepadAxis(self.GamepadID,GamepadAxis.StickLeftX),(0.000000 - 	GetGamepadAxis(self.GamepadID,GamepadAxis.StickLeftY))) * (self.speed * dt)) + body.position)

	do return  end
end

return script2